| Installers/Owner's Responsibility |
 |
Hardwood floors are made from natural products, and therefore, have natural defects. Jiasen Wooden Industry co., Ltd. floors are manufactured in accordance with industry standards. These standards tolerate up to 5% defect. Defects may be the result of nature or the manufacturing process. Before installing any hardwood floor, the installer must ensure that both the job site and the sub-floor meet or exceed all requirements as in the installation instructions. Jiasen Wooden Industry co., Ltd. will not be liable for any flooring that has not been installed according to the instructions as stipulated. The installer is responsible for inspecting the grade, fabrication and finish of the product before installing it. He/She must be selective, and discard or cut off pieces with defects, whatever the source of the defect may be. The use of stain, filler, or putty to correct defects during installation is normal procedure. When ordering Jiasen Wooden Industry co., Ltd. flooring, add 5% to the actual square footage required to allow for cutting, waste and/or manufacturing defects.
All claims must be made before installation. We are not responsible for shipping or installation costs. |
| Tools |
>Circular Saw
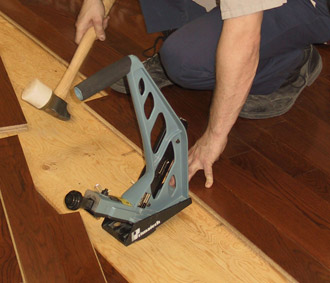
>Power nailer
>Measuring tape
>Chalk line
>Wax stick |
>Mallet
>Hammer
>Nail punch
>7D or 8D nails |
|
| Important Information |
Maintain humidity level between 35% as the dimensions of wood will vary with the seasons and the humidity. To protect your floors and enjoy long-lasting satisfaction,we recommend that you use a humidifier during the winter as wood and electrical heating tend to dry the air.
|
| How to Install |
Remove packaging and allow flooring to air for 72 hours;
Clean the surface and ensure that it is dry;
Install the flooring on plywood that is 1/2 inch or thicker;
If you are installing the flooring directly over a wood floor, sand the rough and high areas and nail;
If the under-floor is made of concrete, do not install flooring over radiant floor heating.
Arrange the flooring in an appropriate pattern, avoiding clustering and joints;
Use flooring from several boxes to ensure a variety of shades;
Use flooring with minor flaws for cutting;
Install flooring perpendicular to the joists;
Use chalk to trace a line 3/4 of an inch from the wall;
Leave a 3/4 inch space along all walls (baseboards and quarter rounds will conceal space);
Install the first floor board with the groove facing the wall and slide along the line;
Nail the board on the top, at 1/4 inch from the edge closest to the wall;
Nail every 12 inches, leaving 3 inches at each end;
Drive nails into the flooring with the nail punch, and use wax to conceal holes;
Using the power nailer, secure flooring with concealed nails;
If you are unable to use the power nailer because of proximity to the wall, drive the nails into the tongue at a 45 degree angle;
Cut the last piece of flooring in the first row, allowing a 3/4 inch distance between the wall and the end;
Start the second row by selecting a floor board that is at least 6 inches longer or shorter than the one next to it;
REPEAT THE SAME PROCESS WITH ALL THE OTHER FLOOR BOARDS.
Arrange the flooring in an appropriate pattern; avoiding clustering and joints aligning with the prior row by 6 inches;
Install flooring by inserting the groove into the tongue;
Using the power nailer, secure flooring with concealed nails;
Cut the floor boards leaving a 3/4 inch space;
Nail the flooring on the top, a 1/4 inch from the edge closest to the wall;
Nail every 12 inches, leaving 3 inches at each end;
Drive nails into the floor boards using the nail punch, and wax to conceal holes;
Install baseboards using finishing nails (colored nails);
Conceal holes using wax in a shade that matches the wood flooring.
Preferable temperature should be maintained at approximately 17-23 C(62-73F) with a relative humidity of 35-55%. Humidy should never be allowed to drop below 30% as this may cause gapping. |
| Installation Instructions Details:пјҲDownloadпјү |
<  |
|
|